Monday, October 19, 2015

Weekend Baking Round up - Acorn Squash Bread & Cheesecake

I have been baking like crazy lately. I think the fall has the perfect conditions for baking - the cool weather, an abundance of apples and pumpkins and football on TV all weekend. My perfect day is spent in the kitchen with my boys "helping" as a taste tester and the hubby doing stuff around the house with football on TV.  I am always looking for new recipes to try out and have decided to share with everyone the best of the weekend baking. 

 My family joined a local Farm CSA this summer and we have gotten A LOT of acorn squash the last few weeks. Acorn squash is not something I have ever cooked with before and I didn't think my husband or kids would go for any of the roasted acorn squash recipes I was seeing online. When I came across this recipe last week for Acorn Squash bread on the blog Eva Bakes, I decided to give it a try. It was a success and another way to sneak some veggies! I decided to make it again this past weekend but played around with the recipe slightly. I doubled the recipe, lessoned the oil by a 1/4 cup and used applesauce for 1 cup of the sugar. I also made them in little pumpkin cupcake molds for the boys and mini bread loaf pans. I cooked them at 350 for 25 min and they came out great!


I also came across this slightly healthier version of a acorn squash bread on the blog, Project Put that Cookie Down Now.  I couldn't decide which to make so I had to just make both.  Once again, I changed up the recipe slightly.  I used applesauce again in this recipe but used it to replace the oil.  I also did not have any walnuts around so instead I used half pumpkin seeds and half sunflower seeds. I love this bread and will make this part of my rotation!


I was in charge of dessert for my niece's christening this past weekend as well.  I had tried out this cheesecake recipe from the blog, The Girl Who Ate Everything, a few months ago and it worked out so great, I made it again.  In place of sour cream in this recipe I used greek yogurt and it was delicious!  I also switched up the bottom and toppings for the cheesecakes.  Using the same cheesecake base, I made a traditional graham cracker crust with a raspberry jam and whipped cream topping, a whole Oreo at the bottom with a whipped cream topping and a piece of Oreo accent and lastly I used a whole Reece's Peanut Butter cup at the bottom with a salted caramel and whipped cream topping. By far, everyone LOVES the Reece's Peanut Butter bottom.  It's a winner!!


No family event is complete without my plate of chocolate covered goodies!  This time around I did chocolate covered Oreo's and pretzels with sprinkles and mini M&M's.  This is such a simple dessert but always a crowd pleaser!!!

Friday, October 16, 2015

Glass Etched Gifts

For me, buying a gift for people seems to be getting harder and harder.  I always want to get something thoughtful and useful but fun and creative at the same time.  Lately, etched glass has been my go to gift.  There are so many options depending on what the person may need.  For Christmas a few years ago, I personalized beer mugs for all the men in my family.  

Since then, I have had a little more practice and now I am making etched glass gifts all the time.  It is easier than you think.   You can either buy an adhesive stencil or if you have a vinyl cutting machine like the Silhouette you can make any number of designs.  I would not recommend using a regular, non-adhesive stencil because you do not want any of the etching paint to get under the stencil.

Recently, it was my husbands grandparent's anniversary so I decided an etched pitcher would make a nice gift for a couple that really doesn't NEED anything.  I found a nice straightforward pitcher at Bed, Bath & Beyond and put their Initial on it with a scalloped circle design around it.

(It is VERY hard to get a decent picture of the pitcher.  This is the best I could do!)


While shopping a second pitcher caught my eye because of the shape and because it was on sale.  Coincidentally, Silhouette was offering a cute "HOME SWEET HOME" image as their free image of the week so I decided to treat myself to a new pitcher.  Instead of using expensive vinyl I found that contact paper from the dollar store worked well for this project.  I used it for both the actual stencil and transfer material.  Make sure the stencil is on your glass well!!  


If using the contact paper, pull the transfer layer back carefully.  I had my straightedge handy for this part as well in case any of the stencil began to lift.


After removing, I carefully applied a thick layer of the glass etching paint to the glass.  This stencil was a little tricky because of the fine lines.  After waiting the time suggested on the etching paint bottle, I washed off the paint and my pitcher was complete. 


Glass etching is such a fun, easy way to personalize any ordinary glassware and the dollar store has some of the best finds!

Monday, June 8, 2015

DIY Heat Transfer Onesies & Kid's Clothes

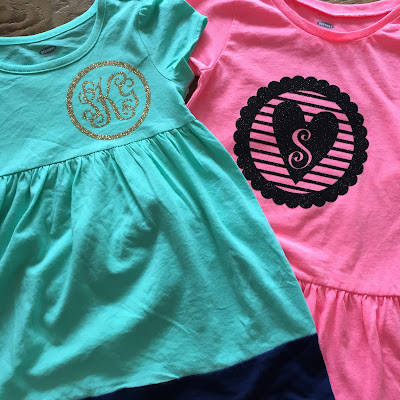
I have a problem when it comes to crafts. I can not stay on any one thing too long. I become completely obsessed with whatever new thing I have started and then quickly move on to something else. Right now I am all about my Silhouette CAMEO. I love the heat transfer vinyl and have been making everything from baby onesies, to T-shirts from my son to customizing outfits for my niece. The custom onesies make a great gift and a fun way to personalize something for someone's little one. Here are a few I have made recently. 


 I love Silhouette's online store and all the designs you can purchase. Recently there was a sale on the Warner Bros. designs and I picked out a few cool Batman designs for my guy. He thought he was pretty cool when he saw me make him a custom shirt. 


 Everything seems to be monogramed lately. It is a fun way to turn something ordinary into something that feels fancy.  I have a VERY fancy niece. (I might be partially to blame for this. Having 2 boys I enjoy any opportunity to make something fun and girly!!!!) I found a couple cute but plain dresses when I was out and decided they would be the perfect canvas for a monogram.


Next I want to make something for myself. The hard part is deciding what to make first!

Thursday, May 28, 2015

Purple Spring Wreath

I have been so terrible about updating my blog the past few months and it is not for lack of content!  I have been busy crafting, baking, and learning new hobbies.  The problem is I have also been busy working and taking care of my boys.  I just do not seem to have the time to write a blog post.  More correctly, I do not have the time to take nice pictures! That is probably the most challenging part of blogging for me so excuse my pictures but I had to share my newest project.


I have been seeing a bunch of great tutorials for wreaths on Pinterest lately and I don't know about 
you but I have a hard time spending the money on a nice wreath.  I decided I was going to try my hand and make my own.  I went to AC Moore with my $10 off coupon and started picking out some silk flowers.  I found these pretty small delicate flowers that had a lot of blooms on one stem for $1.


I bought about 20 of them in 2 shades of purple, white and green along with 3 big hydrangea blooms.  I also bought a grapevine wreath.  The grapevine wreath makes this project a breeze.  I simply started to stick the stem of the flower into the grapevine wreath.  I kept making my way around arranging the colors how I liked them.  Any stems that stick out to much can be cut with wire cutters.  Also, if any part of the flowers stick out a little too far, you can tie them to the wreath with flower wire.  


I cut the hydrangea stems low and fixed them into the wreath.  I also cut the leaves off the stem to add some green to the wreath.  I love the way it came out!  I saw wreaths that I did not love as much in the store for $50 and this probably cost me $20 total.  (Probably would have been cheaper if I waited for the flowers to be on sale but I am impatient when I have a project in mind!)